
티스토리 뷰
사실 시작을 한지 시간이 좀 많이 흘렀다.
그 동안 제품을 받기위한 준비, 아이디어 회의 등 많은 역경을 거치고 구체적인 자료를 얻은 날!!!
1. Serial-Oscilloscope 을 컴퓨터로 사용하여 심박수 센서 값 얻기

 012
012
2. 심박수에 따라 자동차 제어하기


 012
012
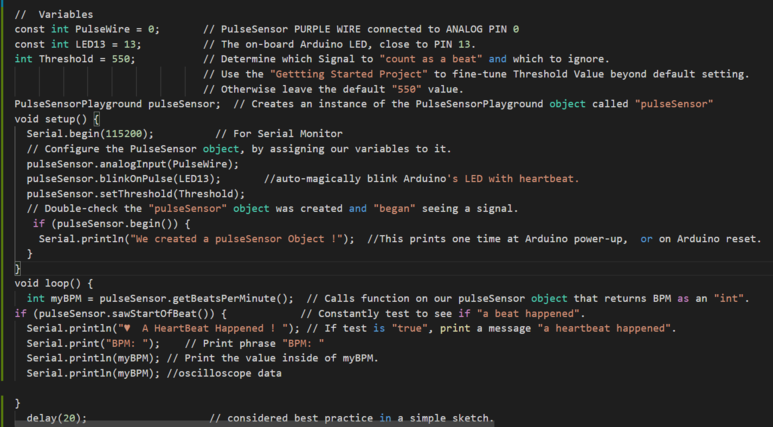
< 소스 코드 >
#define USE_ARDUINO_INTERRUPTS true    // Set-up low-level interrupts for most acurate BPM math.
#include <PulseSensorPlayground.h>     // Includes the PulseSensorPlayground Library.

//  Variables
const int PulseWire = 0;       // PulseSensor PURPLE WIRE connected to ANALOG PIN 0
const int LED13 = 13;          // The on-board Arduino LED, close to PIN 13.
int Threshold = 550;           // Determine which Signal to "count as a beat" and which to ignore.
                               // Use the "Gettting Started Project" to fine-tune Threshold Value beyond default setting.
                               // Otherwise leave the default "550" value.

PulseSensorPlayground pulseSensor;  // Creates an instance of the PulseSensorPlayground object called "pulseSensor"

/* L9110s 모터드라이버
   오른쪽모터
   L9110s A_1A D6
   L9110s A_1B D11
   왼쪽모터
   L9110s B_1A D3
   L9110s B_1B D5
*/
int A_1A = 6;
int A_1B = 11;
int B_1A = 3;
int B_1B = 5;

//모터의 좌우 속도가 다를 경우,
//아래의 변수를 조정하여 해결할 수 있습니다.
int motorASpeed = 150; // 모터A 속도 (0~255)
int motorBSpeed = 150; // 모터B 속도 (0~255)

void setup() {

  Serial.begin(9600);          // For Serial Monitor

  // Configure the PulseSensor object, by assigning our variables to it.
  pulseSensor.analogInput(PulseWire);
  //pulseSensor.blinkOnPulse(LED13);       //auto-magically blink Arduino's LED with heartbeat.
  pulseSensor.setThreshold(Threshold);

    //핀을 초기화합니다.
  //L9110S 모터드라이버의 핀들을 출력으로 변경합니다.
  pinMode(A_1A, OUTPUT);
  pinMode(A_1B, OUTPUT);
  pinMode(B_1A, OUTPUT);
  pinMode(B_1B, OUTPUT);
  digitalWrite(A_1A, LOW);
  digitalWrite(A_1B, LOW);
  digitalWrite(B_1A, LOW);
  digitalWrite(B_1B, LOW);

  // Double-check the "pulseSensor" object was created and "began" seeing a signal.
   if (pulseSensor.begin()) {
    Serial.println("We created a pulseSensor Object !");  //This prints one time at Arduino power-up,  or on Arduino reset.
  }
}

void loop() {

 int myBPM = pulseSensor.getBeatsPerMinute();  // Calls function on our pulseSensor object that returns BPM as an "int".
                                               // "myBPM" hold this BPM value now.

if (pulseSensor.sawStartOfBeat()) {            // Constantly test to see if "a beat happened".
 Serial.println("♥  A HeartBeat Happened ! "); // If test is "true", print a message "a heartbeat happened".
 Serial.print("BPM: ");                        // Print phrase "BPM: "
 Serial.println(myBPM);  // Print the value inside of myBPM.
 forward();
}
else if(70>myBPM){
  stop();
}
  delay(20);                    // considered best practice in a simple sketch.

}

/**
   RC카 전진
   왼쪽,오른쪽 모터를 정회전하여 전진합니다.
*/
void forward() {
  //모터A 정회전
  analogWrite(A_1A, motorASpeed);
  analogWrite(A_1B, 0);
  //모터B 정회전
  analogWrite(B_1A, motorBSpeed);
  analogWrite(B_1B, 0);
}

/*                                                                                                                                                                                                                                                                                                                                                                                                                                                                                                                                                                                                                                                                                                            ==================                                                                                                                                                                                                                                                                                                                                                                                                                                                                                                                                                                                                                                                                                                                                                                                                                                                                                                                                                                                                                                                                                                                                                                                                                                                            ]
   RC카 정지
   오른쪽,왼쪽모터를 모두 정지합니다.
*/
void stop() {
  //모터A 정지
  analogWrite(A_1A, 0);
  analogWrite(A_1B, 0);
  //모터B 정지
  analogWrite(B_1A, 0);
  analogWrite(B_1B, 0);
}
반응형
'활동 > ETC' 카테고리의 다른 글
| kakao Coding Test (0) | 2020.09.17 |
|---|---|
| Naver 오픈 클래스 (0) | 2020.09.15 |
| Japan internship (0) | 2020.09.14 |
| Developer Student Clubs(Google) (0) | 2020.08.27 |
| 아두이노 만들기 (2) (0) | 2020.08.24 |
공지사항
최근에 올라온 글